Creating 3D Textures for 3D Printing

Different textures have been part of design for ever. From the bark of a tree, a cracked leather surface to the padding of a sofa. But it has never been this easy to design and create 3D textures. Using Blender 3D, a black and white image and 3D printing you can let your creativity roam free and create unique haptic experiences.

I will show you how to create those 3D textures in under one minute with the free and open source tool Blender 3D.

Creating a 3D texture structure in under 1 minute

Looking for Design help? Check out my new AI CAD Co-Pilot:

Hi, I am Cadi your CADvisor,

an AI-powered Co-Pilot designed to revolutionize the way architects and designers approach their projects.

1. Create a Mesh

So first of all you need a mesh or an STL-file. If you created the mesh with blender you can adapt the mesh size with the Subdivision Surface Modifier or the Decimate Modifier for STL-files.  The higher your resolution of the mesh, the higher the resolution of your texture. The texture is created by moving triangles according to grey pixels on your image. So your image should be of a higher resolution than your mesh, and your mesh should be of a higher resolution than your 3D printing process.

2. Unwrap Mesh

To tell the software which pixels of the black and white image are related to which triangles on your mesh, you have to unwrap your mesh to make it 2D. You can see it like unfolding a paper box to be flat again. Therefore it is better to make seams in areas which are not very visible. Using the Smart UV Project is normally the best solution. If you only want to have  a perfect texture from one viewpoint, the Project from View way is your friend. No fear! You can always come back and edit the way you unwrap you surface.

3. Displacement Modifier

Use the Displacement Modifier and upload your black and white image in the texture field. I set the strength of the modifier low and change the coordinates to UV, to create a good result from the beginning. But you can play around with these settings, even after selecting the image. In case you would like to have your texture only on certain areas, you can select the certain area of your mesh and create a vertex group. Then select this vertex group in your modifier to only apply the displacement there.

4. Adapt Mesh Size

To create a 3D texture you need a black and white image. According to the grey scale of each pixel, the triangles are extruded. You can invert the colors or increase contrast and other effects inside blender. So no need to make all image edits beforehand. But keep in mind, that this image is repeated over all the surface of the mesh, so try to create images with smooth transitions between each other or you will see ugly seems over your mesh.

There are thousands of free Blender textures available in the internet. For the 3D texture, you only need the black and white image of those Blender materials. At the end of this article I will give you an overview of my favorite sources.

5. Edit Placement on UV Map

In the UV map you can change how your mesh is projected on to the 2D black and white image. You can scale the mesh, to make the elements appear bigger or smaller on your model, rotate it or place it in different areas of the image. When scaling, always keep in mind the resolution of your image. If your pixels are bigger than your triangles, you will end up with a bad resolution of your texture.

6. Adjust Strength of Displacement

As previously mentioned, in the displacement modifier you can adjust the strength of displacement of your mesh. This way, you can adapt your 3D texture to your model and your preferred look. Another way to adapt this, is by tweaking your image through contrast, color curves, brightness and effects like distortion, which is available in the image panel.

When setting this strength, I have to remind you of the mantra I mentioned in my article Unlocking the full potential of SLS Production: Keep the printing process in mind!

In this case I want to remind you of the detail resolution of the process you are using. Hence, make sure the displacement is strong and big enough to see it on your final part after printing.

Thousands of free 3D Textures

This process of creating 3D textures for 3D printing would be only half as amazing if you had to create all black and white images yourself. But the amazing community of Blender users are providing the world with thousands of free, creative and amazing textures for you to use on your projects!

Here is an overview of my favorite resources for textures:

  • Poliigon.com – The first platform of such I came across, through the amazing youtube tutorials of the Blender Guru. Not all textures are free, but the content is really high quality and covers many different fields.
  • Texturehaven.com A new patreon backed platform for high quality 8k 100% free and CC0 licensed textures. More and more are uploaded every week.
  • 3dtextures.me – Last but not least my favorite one. An amazing stack of free seamless textures of all different areas and topics. I was amazed by the alien category and just love to use new futuristic surfaces in my design for 3D printing. 

When scrolling through these vast numbers of amazing 3D textures, I hope your 3D printing heart jumps as high as mine. Please appreciate the work of these talented artists and buy them a coffee!

Did you find better resources? Then let me know and comment below.

Free 3D textures – Source: 3dtextures.me

Discover the ultimate online repository of 3D models by HUM3D for design, AR, and visualization purposes, where you can explore an extensive collection of automobiles, furniture, electronics, and various other 3D objects.

I hope this quick overview of the 3D texture tool is helpful for you. Please feel free to comment or send me your creations and ask me any questions!

Sign up to stay up to date about the newest tricks in

Design for 3D printing.

V

[ABTM id=2505]

Kommentare

9 Antworten zu „Creating 3D Textures for 3D Printing“

  1. Avatar von Yavuz Erdoğan
    Yavuz Erdoğan

    Helllo .. Thanks to for clear explanation.
    I try to wrapping the texture on the shoe sole ..

    I will follow you

    Kindly Regards

  2. Hi, Very nice tutorial, thank you!

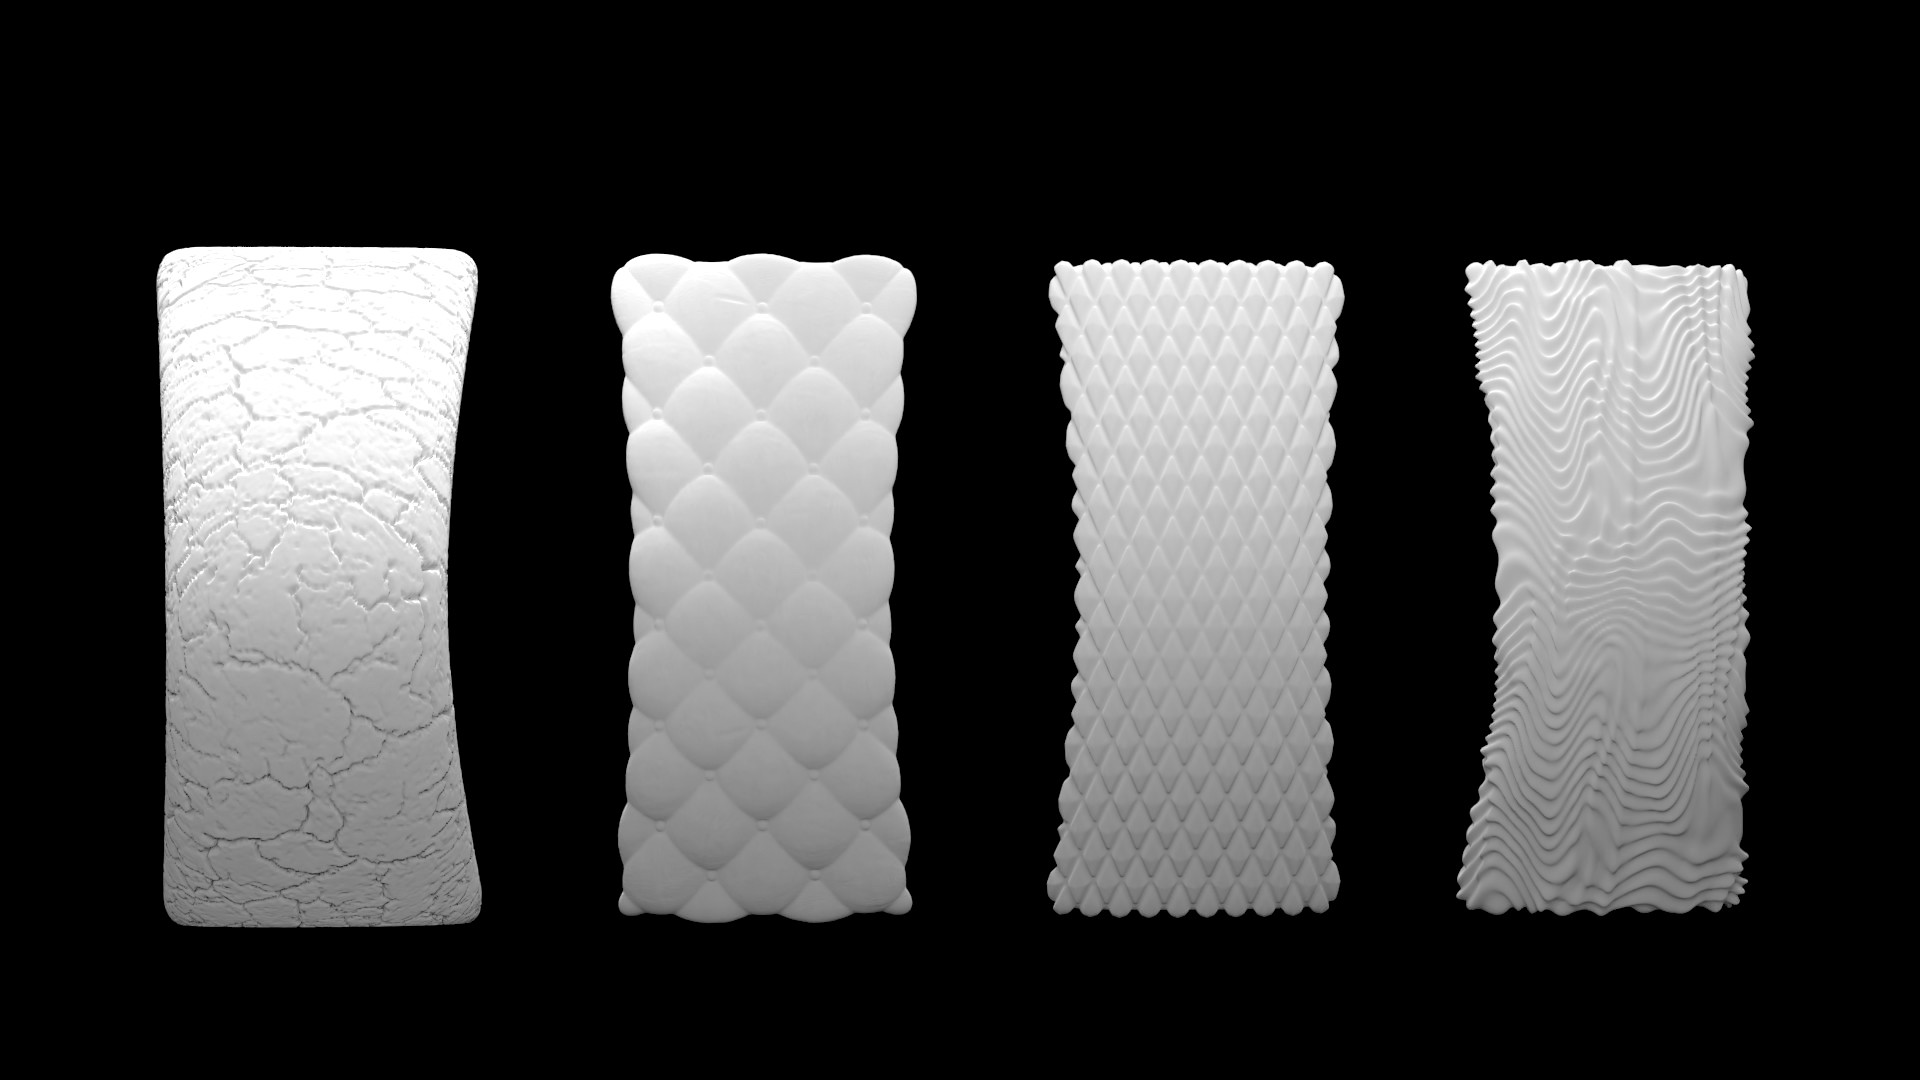
    The only problem, that I made a texture on a 165x65mm plate, only 2 mm thick, and due the high mesh, the stl file come out in 120MB size. I wanna print it w my resin printer, and the slicer software even could not handle it. 🙁

    Is there any way to reduce the size?

    thx

    1. Hi csaba, after applying the texture modifier you can use the decimate mesh modifier to reduce the number of triangles. But check so you don’t reduce it too much and damage your texture. You could also separate your design in plates which repeat them selves, like the texture image. So instead of printing one large plates you separate it in four plates. Other softwares can also reduce the mesh resolution like Rhino or Solidworks when you export it.

  3. Avatar von Dr. Woo
    Dr. Woo

    Another excellent free Texture Library can be found at https://cc0textures.com/

  4. Avatar von William Cydylo
    William Cydylo

    Another person or You Tube channel to get textures is Ryan King Art , I’ve learned more on his channel then any others, I’m sure it is both the teacher and student.
    Also does this work with fdm printers ?

  5. Avatar von William Cydylo
    William Cydylo

    Another person or You Tube channel to get textures is Ryan King Art , I’ve learned more on his channel then any others, I’m sure it is both the teacher and student.
    Also does this work with fdm printers ?

  6. Have you tried https://withpoly.com/ before? it’s free and you can make your own HD textures with up to 32-bit pbr maps

  7. Avatar von Christa Tresch
    Christa Tresch

    Thank you for taking the time to elaborate this process in blender!

Schreibe einen Kommentar

Deine E-Mail-Adresse wird nicht veröffentlicht. Erforderliche Felder sind mit * markiert

Diese Website verwendet Akismet, um Spam zu reduzieren. Erfahre mehr darüber, wie deine Kommentardaten verarbeitet werden.